


Visual tips for crispy roasted chicken skin?

The Quest for Golden, Crackling Skin
Nothing elevates a roasted chicken quite like skin that’s perfectly golden, shatteringly crisp, and bursting with flavor. While it might seem like a culinary enigma, achieving this coveted texture is entirely within reach with a few key techniques. This guide will walk you through the visual cues and methods to transform your chicken from ordinary to extraordinary, ensuring that every bite delivers that satisfying crunch.

1. The Moisture-Free Zone: Patting Dry
The absolute first step, and arguably the most crucial, is to eliminate as much moisture as possible from the chicken’s surface. Water is the enemy of crispness. Before seasoning, take several sheets of paper towel and thoroughly pat down every inch of the chicken skin – front, back, and even under the wings. You want it to feel completely dry to the touch. For an even better result, some chefs recommend refrigerating the uncovered chicken for a few hours, or even overnight, to allow the skin to air-dry further. You’ll visibly notice the skin tightening and drying out, indicating it’s ready for roasting.
2. High Heat Initiation: The Crispness Catalyst
Starting your chicken in a hot oven is vital for shocking the skin into crispness and rendering fat quickly. Preheat your oven to a high temperature, typically around 425°F (220°C). This initial blast of heat helps to rapidly evaporate surface moisture and kickstart the browning process. You’ll observe the skin quickly changing color, moving from pale to a light golden hue within the first 20-30 minutes. After this initial searing, you can reduce the temperature to a more moderate 375°F (190°C) to allow the chicken to cook through evenly without burning the skin.
3. Embrace the Fat: Seasoning and Brushing
Don’t be shy with fat! A generous rub of olive oil or melted butter over the dried skin not only helps with browning but also contributes to the rendering process. Ensure every crevice is coated, especially around the leg and thigh joints. Season liberally with salt and pepper, or your favorite rub, as these also aid in drawing out moisture and enhancing flavor. As the chicken roasts, you’ll see the fat begin to bubble and render, creating a delicious basting liquid that continuously crisps the skin. This visual sign of bubbling fat is key to achieving that desired crackle.

4. The Power of Airflow: Elevation is Key
For truly crispy skin all around, proper airflow is non-negotiable. Roasting your chicken directly on a flat pan can leave the bottom skin soggy. Instead, place the chicken on a wire rack set inside a rimmed baking sheet. This allows hot air to circulate completely around the bird, ensuring even cooking and crisping on all sides, including the underside. Visually, you’ll see the heat evenly browning the entire surface, rather than just the top. Avoid crowding the oven with other dishes that might impede airflow.
5. The Final Flourish: Basting and Resting
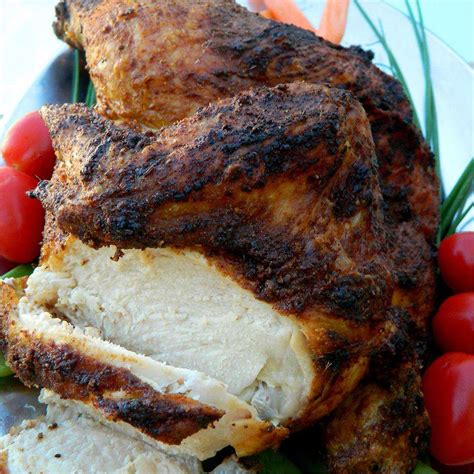
While continuous basting can soften skin, a few strategic bastes towards the end of the cooking time, using the rendered pan juices, can enhance color and flavor without compromising crispness. Watch for a deep, rich golden-brown color, indicating optimal crispness. Once the chicken reaches its internal temperature (165°F or 74°C in the thickest part of the thigh), remove it from the oven. Crucially, let it rest, uncovered, for at least 15-20 minutes before carving. This allows the juices to redistribute and, importantly, prevents steam from building up and softening the precious crispy skin. You’ll notice the skin remaining taut and crunchy as it rests, a visual testament to your success.
Mastering the Crispy Crunch
Achieving consistently crispy roasted chicken skin is a skill that comes with practice, but by focusing on these visual tips – ensuring a dry surface, starting with high heat, embracing fat, promoting airflow, and allowing a proper rest – you’ll be well on your way to culinary perfection. Each step contributes to that delightful crackle and golden hue that makes roasted chicken a true crowd-pleaser. Happy roasting!


