Optimize Visual Bites: what framing/lighting makes recipes irresistible to foodies?
The Allure of the Eye: Why Visuals Trump Taste (Initially)
In the digital age, a recipe’s journey from kitchen to plate often begins not with a taste, but with a gaze. For foodies, the visual presentation of a dish is paramount – it’s the invitation, the promise, the tantalizing whisper that precedes the first bite. A poorly framed or dimly lit photograph can doom even the most delicious creation to obscurity, while a stunning image can elevate a simple meal to an aspirational experience. To make your recipes truly irresistible, mastering the art of food photography, particularly framing and lighting, is non-negotiable.
This article delves into the core principles that professional food photographers employ to make dishes sing on screen. We’ll explore how strategic framing draws the eye to key elements and how thoughtful lighting sculpts texture and color, ensuring your visual bites are as delicious as the food itself.
Framing the Feast: Composition Techniques That Captivate
Framing is about guiding your viewer’s eye and telling a story within the confines of your shot. It dictates what’s included, what’s excluded, and how the elements interact. For food photography, several techniques consistently deliver mouth-watering results:
- The Rule of Thirds: Imagine your shot divided into nine equal parts by two horizontal and two vertical lines. Placing your main subject or points of interest along these lines or at their intersections creates a more dynamic and engaging composition than simply centering everything.
- Leading Lines: Utilize elements like cutlery, table runners, or even the natural lines of the food itself to draw the viewer’s gaze towards the hero of the dish.
- Negative Space: Don’t be afraid of empty areas. Negative space (the area around and between objects) can make your subject stand out, provide breathing room, and create a sense of elegance and focus.
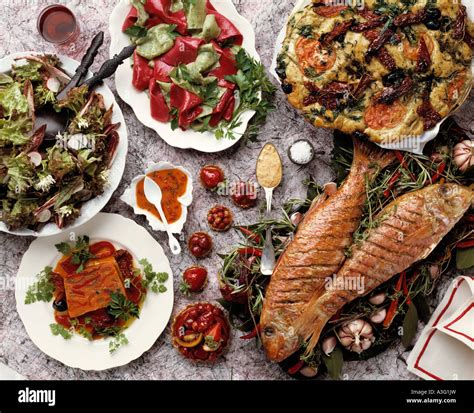
- Angles Matter: Experiment with different perspectives. An overhead (flat lay) shot works wonderfully for showcasing ingredients or a spread of dishes. A 45-degree angle mimics how a diner views their plate, ideal for dimension. Eye-level shots are intimate and great for tall dishes like cakes or burgers.
- Depth of Field: Use a shallow depth of field (blurry background/foreground) to make your main dish pop, drawing all attention to its intricate details.
Each recipe might call for a different approach, so practice and observation are key to finding the most compelling frame.
Illuminating Indulgence: The Art of Food Lighting
Lighting is the single most powerful tool in food photography. It can make a dish look fresh and vibrant, or dull and unappetizing. The goal is to highlight textures, bring out natural colors, and create appealing shadows that add depth without obscuring details.
Natural Light: Your Best Friend
The golden rule for most food photographers is to use natural light, ideally from a large window. It’s soft, diffused, and free. Position your food near the window, but never in direct harsh sunlight, which creates unflattering hotspots and deep, distracting shadows. Instead:
- Backlighting: Placing your food between the light source and the camera can create beautiful rim light, making liquids glow and highlighting edges. Just be sure to use a reflector or fill card (even a piece of white foam board) to bounce some light back onto the front of the dish, preventing it from appearing silhouetted.
- Side Lighting: Positioning the light source to the side of your dish creates appealing shadows that emphasize texture and dimension, giving the food a more three-dimensional feel. This is often considered the most flattering light for food.
- Diffusers: If your natural light is too harsh, use a sheer curtain, parchment paper, or a professional diffuser to soften it.

Harnessing Artificial Light (When Natural Isn’t Enough)
When natural light is scarce, artificial light can be a viable alternative, but it requires more control. Use continuous lights (LED panels are popular) or strobes with softboxes or umbrellas to mimic soft, diffused natural light. Pay attention to:
- Color Temperature: Ensure your artificial light is balanced to avoid unnatural color casts.
- Placement: Apply the same principles of back and side lighting as with natural light.
- Modifiers: Softboxes and diffusers are crucial for softening harsh artificial light and creating even illumination.
Props, Backgrounds, and Storytelling
Beyond the food itself, the supporting elements in your frame contribute significantly to its irresistible appeal. Choose props and backgrounds that enhance, rather not distract from, the star of the show.
- Keep it Simple: A busy background or too many props will clutter the image and detract from the food. Less is often more.
- Texture and Color: Select props (linens, cutlery, serving dishes) with appealing textures and a complementary color palette. Muted, earthy tones often work best to let the food’s natural colors shine.
- Tell a Story: A strategically placed crumb, a half-eaten forkful, or ingredients used in the recipe can add narrative and make the dish feel more inviting and authentic.
- Backgrounds: Simple, clean backgrounds like plain wood, slate, or textured fabric are versatile. Avoid anything too reflective or distracting.
The Final Polish: Post-Processing for Perfection
While good framing and lighting lay the essential groundwork, a touch of post-processing can elevate your images further. Adjustments to exposure, contrast, white balance, and saturation can fine-tune colors, deepen shadows, and make your food truly pop. However, always aim for natural enhancements; the goal is to make the food look even more like itself, not something artificial.
Conclusion: Practice Makes Perfect Plates
Creating irresistible visual bites is an ongoing journey of learning and experimentation. By understanding and applying the principles of effective framing and thoughtful lighting, you can transform your recipe photography from mere documentation into compelling storytelling. Each ingredient, every texture, and all the vibrant colors of your culinary creations deserve to be showcased in their best light. So grab your camera, experiment with angles, chase that beautiful window light, and watch your recipes become truly irresistible to every foodie’s eye.