


Best mobile camera settings for mouth-watering visual bites for foodies?

Mastering Your Mobile Camera for Irresistible Food Shots
In today’s visually-driven world, a picture is often the first bite. For foodies, transforming a delicious meal into a drool-worthy visual feast on social media requires more than just good food; it demands smart photography. Your smartphone, a powerful tool in your pocket, can capture stunning culinary moments if you know how to tweak its settings. Let’s dive into the essential mobile camera adjustments that will elevate your food photography from mundane to magnificent.
Focusing on Perfection: The Sharpness Secret
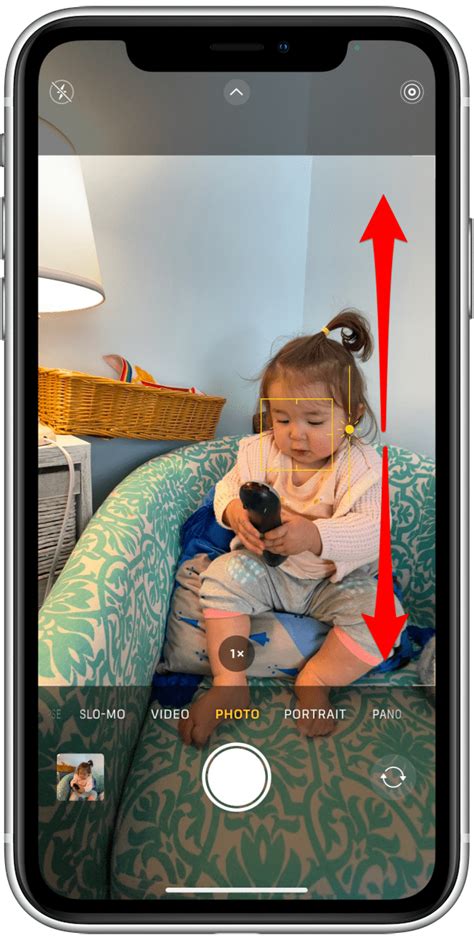
The most critical element for any great food photo is sharp focus. While your phone’s auto-focus is good, manually tapping on the most appealing part of your dish (often the hero ingredient or the textured surface) ensures it stands out. This action not only sets the focus but also often adjusts the exposure for that specific area. Always check that your main subject is crisp and clear, making it the undeniable star of your visual bite.
Exposure Control: Brightness Done Right
Food generally looks best when well-lit, but overexposure can wash out details, and underexposure can make it unappetizing. After tapping to focus, you’ll usually see a sun icon or a slider appear. Dragging this up or down allows you to manually adjust the brightness (exposure). Aim for a balance where colors are vibrant, and textures are visible without harsh shadows or blown-out highlights. Natural light is your best friend here, so try to shoot near a window!
White Balance: True Colors of Your Cuisine
Have you ever noticed your food looking too yellow or too blue in photos? That’s often a white balance issue. While many phones do a decent job automatically, some professional camera apps offer manual white balance control. If available, experiment with presets like ‘Daylight’ or ‘Cloudy’ or fine-tune the Kelvin temperature to ensure your food’s colors appear accurate and appetizing, just as they do in person.
Grid Lines: Composing Your Culinary Masterpiece
Turn on the ‘Grid Lines’ feature in your phone’s camera settings (usually found under ‘Camera’ in your phone’s main settings menu). This overlays a nine-square grid on your screen, helping you apply the ‘Rule of Thirds.’ By placing your food subject along these lines or at their intersections, you can create more dynamic and visually appealing compositions. It also helps keep your horizons (or tabletops) straight, which is crucial for a polished look.

Portrait Mode (Background Blur): Isolate Your Dish
Many modern smartphones offer a ‘Portrait Mode’ that intelligently blurs the background, making your food pop. This creates a beautiful depth of field, drawing the viewer’s eye directly to your delicious subject. While primarily designed for people, it works wonders for food. Experiment with the depth slider (if available) to adjust the intensity of the blur, ensuring your food remains sharp while distracting backgrounds melt away.

Beyond the Capture: Smart Editing for Food
Even with perfect camera settings, a little post-processing can elevate your photos. Most phones have built-in editing tools, and many free apps like Snapseed or Lightroom Mobile offer advanced options. Focus on subtle adjustments: slightly boosting contrast, sharpening details, fine-tuning highlights/shadows, and enhancing saturation just enough to make colors vibrant without looking artificial. Remember, the goal is to enhance, not to overhaul.
Final Bites of Advice
Practice makes perfect! Experiment with different angles – overhead flat lays, eye-level shots, or close-ups highlighting texture. Pay attention to styling; a few crumbs, a neatly placed utensil, or a sprinkle of herbs can add character. By mastering these mobile camera settings and incorporating a few thoughtful styling touches, you’ll be well on your way to creating truly mouth-watering visual bites that captivate your foodie audience.


