Best visual tips for vibrant fresh herb storage to elevate your foodie plates?

The Secret to Ever-Vibrant Herbs
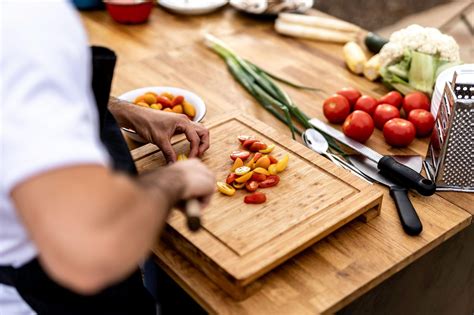
Fresh herbs are more than just a garnish; they are the vibrant soul of any memorable dish, injecting bursts of flavor, aroma, and color. For food enthusiasts, the dilemma often lies in preserving their delicate beauty and potency beyond a day or two. Wilting, browning herbs not only diminish taste but also detract from the visual appeal of an otherwise exquisite plate. But what if you could keep them looking and tasting as if they were just picked?
This guide will walk you through visually appealing and highly effective methods to store your fresh herbs, ensuring they remain bright, fragrant, and ready to transform your culinary masterpieces.

Mastering the “Bouquet” Method for Sturdy Herbs
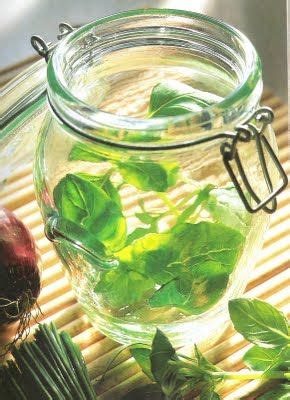
This classic method is perfect for herbs with sturdy stems, much like how you’d treat a bouquet of flowers. Think parsley, cilantro, basil, mint, dill, and chives. The goal is to provide hydration while allowing them to breathe.
How to do it:
- Trim Stems: Snip about half an inch off the bottom of the stems. This opens up the capillaries, allowing them to absorb water more efficiently.
- Water Bath: Place the trimmed herbs upright in a glass jar or vase filled with an inch or two of fresh, cold water.
- Cover and Chill: For most herbs (except basil, which prefers room temperature), loosely cover the entire setup with a plastic bag. This creates a mini-greenhouse, trapping humidity. Store in the refrigerator.
- Basil Exception: Basil is sensitive to cold. Store it on the counter, away from direct sunlight, changing the water daily.
- Water Refresh: Change the water every day or two to prevent bacterial growth.
Visually, this method is stunning. A collection of glass jars filled with perky green herbs adds a beautiful, fresh touch to your kitchen counter or fridge shelf.

The “Burrito” Method for Tender-Leafed Varieties
Some herbs, like arugula, spinach, or even delicate salad greens (though not strictly herbs), benefit from a different approach. The “burrito” method keeps them moist without submerging their leaves, preventing sogginess and decay.
How to do it:
- Gentle Wash (Optional): If herbs are particularly dirty, give them a quick, gentle rinse and then dry them thoroughly with a salad spinner or paper towels. Moisture is key, but excess water can lead to rot.
- Damp Paper Towel: Lay out a slightly damp (not soaking wet) paper towel.
- Roll Them Up: Place the herbs in a single layer on the paper towel and gently roll them into a loose “burrito” shape.
- Seal and Store: Place the rolled bundle into a resealable plastic bag or an airtight container. Store in the crisper drawer of your refrigerator.
This method keeps herbs crisp and protected, and clear containers allow you to admire their freshness.
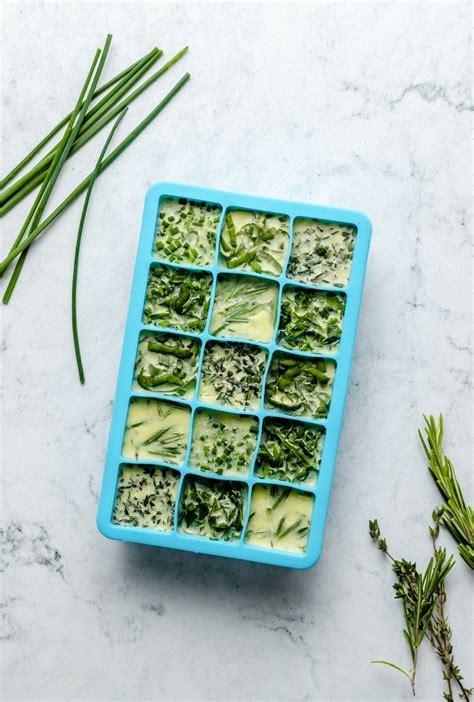
Freezing for Long-Term Vibrancy and Convenience
When you have an abundance of herbs or want to preserve their flavor for months, freezing is an excellent option. While the texture might change slightly, the flavor and color remain largely intact, making them perfect for cooking.
How to do it:
- Chop and Cube: Finely chop your herbs.
- Ice Cube Tray Method: Pack the chopped herbs into ice cube trays.
- Liquid Medium: Cover the herbs with olive oil, melted butter, or even water. Oil works best for most savory herbs as it preserves flavor and prevents freezer burn.
- Freeze Solid: Place the trays in the freezer until the cubes are completely solid.
- Transfer: Pop the frozen herb cubes out of the trays and transfer them to a freezer-safe bag or container. Label with the herb type and date.
Imagine pulling out a vibrant green cube of basil-infused olive oil in the dead of winter! It’s a visual delight and a flavor savior.
Elevate Your Kitchen Aesthetics with Smart Storage
Beyond functionality, how you store your herbs can also contribute to your kitchen’s visual appeal and your overall cooking experience. Think like a designer for your culinary space:
- Clear Glass Jars: Use attractive, clear glass jars or mason jars for the “bouquet” method. They look beautiful on the counter or in the fridge, showcasing the fresh greens.
- Labeled Containers: For frozen herbs or those stored in “burritos,” use clear, stackable containers or Ziploc bags that are clearly labeled. This makes it easy to identify what you have at a glance, adding to a sense of order and professionalism.
- Designated Herb Drawer: If space allows, dedicate a section of your fridge to herbs, perhaps with a small, attractive organizer.
A visually organized and appealing herb station can inspire creativity and make cooking a more joyful, less cluttered experience.

Final Tips for Maximizing Herb Life and Impact
- Inspect Regularly: Remove any wilting or browning leaves immediately to prevent spoilage from spreading.
- Gentle Handling: Herbs are delicate. Handle them with care to avoid bruising.
- Don’t Overwash: Wash herbs only when you’re about to use them, unless they are very dirty and you’re using the “burrito” method. Excess moisture promotes rot.
- Know Your Herbs: Different herbs have different needs. Basil, as mentioned, hates the cold, while hardy rosemary and thyme can withstand more.
- Cut, Don’t Tear: When using herbs, cut them with a sharp knife or kitchen shears rather than tearing, which can bruise leaves.
By implementing these visual and practical tips, you’ll not only extend the life of your fresh herbs but also ensure they contribute their maximum vibrancy, flavor, and aesthetic appeal to every dish you create. Say goodbye to sad, soggy herbs and hello to a culinary world brimming with freshness!