For “Visual Bites,” what natural light setup ensures foodies crave your dishes?
The Irresistible Power of Natural Light in Food Photography
In the world of “Visual Bites,” where every image vies for attention and tastebuds, natural light isn’t just a preference—it’s a secret weapon. Harnessing ambient light can elevate your food photography from merely presentable to utterly mouth-watering, making your dishes virtually leap off the screen and into the cravings of foodies everywhere. Unlike artificial lighting, natural light offers a softness, authenticity, and nuanced play of shadows that genuinely enhances textures and colors, bringing out the inherent beauty of your culinary creations.
But simply placing food near a window isn’t enough. Crafting that crave-worthy shot requires understanding specific natural light setups and techniques. The goal is to create depth, highlight key features, and evoke an emotional response that leaves viewers hungry for more.

Mastering Diffused Window Light: The Gold Standard
The most accessible and arguably most effective natural light setup involves a window. However, direct, harsh sunlight can create unappealing hot spots and deep, unflattering shadows. The trick is diffusion. Positioning your food near a window that receives indirect light, or diffusing direct light with a sheer curtain, white sheet, or a professional diffusion panel, is crucial. This softens the light, creating gentle transitions between highlights and shadows that add dimension without being distracting.
For most food shots, side lighting or backlighting from a window works wonders. Side lighting emphasizes texture and form, making a crust look crispier or a sauce more lustrous. Backlighting, on the other hand, can create beautiful rim lighting, making steam visible and adding a halo effect that elevates the dish to an almost ethereal level. Avoid front lighting, as it often flattens the image and reduces visual interest.
The Art of Reflection and Fill Light
Even with diffused window light, one side of your dish might still appear too dark, losing critical detail. This is where reflectors come into play. A simple white foam board, a piece of white cardstock, or even a specialized photography reflector can bounce light back into the shadowed areas, gently filling them in without creating new harsh shadows. This technique adds depth and ensures that all elements of your dish are beautifully illuminated.

Experiment with the distance and angle of your reflector to achieve the desired balance. A closer reflector will provide more fill, while moving it further away will create softer, more subtle illumination. For a warmer tone, a gold reflector can be used, but for food, a neutral white surface usually provides the most accurate and appealing color rendition.
Strategic Angles and Composition for Impact
The angle from which you shoot plays a pivotal role in how the natural light interacts with your food and, ultimately, how appetizing it appears. Overhead shots (flat lays) are excellent for showcasing the entire composition of a meal, ingredients, or a spread of dishes, with light often coming from above or slightly to the side to create soft, uniform shadows.

A 45-degree angle is a versatile classic, mimicking how we naturally view food at a table, highlighting both the top and sides of a dish. For dishes with height, such as stacked pancakes or a towering burger, shooting straight on can emphasize their impressive stature, with light falling gently across their surfaces.
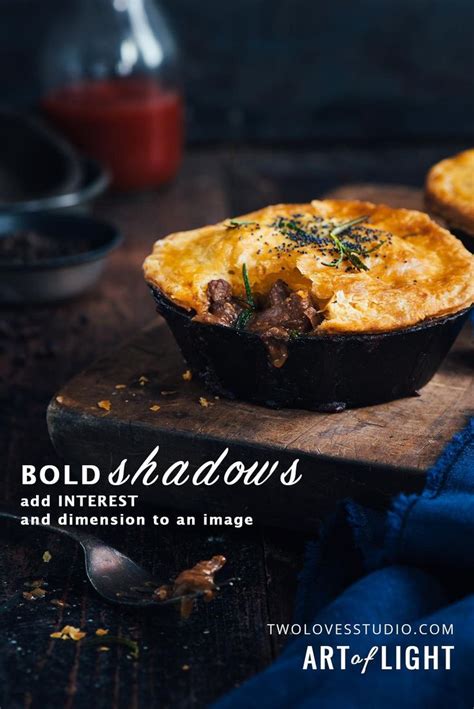
Enhancing the Narrative with Highlights and Shadows
Don’t be afraid of shadows; embrace them! Soft, well-placed shadows add mood, depth, and a sense of realism that artificial lights often struggle to replicate. They can define contours, separate elements, and guide the viewer’s eye. Similarly, strategically placed highlights—like the glint on a perfectly glazed pastry or the sheen on a fresh piece of fruit—draw attention to textures and freshness.
Observe how the light falls on your dish. Does it emphasize the crispiness of the crust? The juiciness of the meat? The creaminess of the sauce? Adjust your setup, dish placement, and camera angle until these key elements are beautifully highlighted, telling a delicious story without uttering a single word.
Conclusion: Light as the Ultimate Ingredient
For “Visual Bites” that truly resonate, natural light is more than just a source of illumination; it’s an essential ingredient. By understanding how to diffuse window light, utilize reflectors effectively, choose the right angles, and artfully manage highlights and shadows, you can transform your food photographs into captivating works of art that ignite hunger and inspire foodies to crave your dishes. With a thoughtful approach to natural light, every click becomes an invitation to a delicious experience.