


What quick plating hacks make any dish Instagram-ready for stunning food photos?
The Art of the Appetizing Snapshot: Making Food Instagram-Ready
In today’s visually-driven world, a dish isn’t truly enjoyed until it’s been admired on Instagram. But transforming a home-cooked meal into a scroll-stopping masterpiece doesn’t require culinary school or a professional stylist. With a few quick plating hacks, you can elevate your food photography game and make any dish shine like it belongs in a gourmet magazine.
Forget complicated techniques; we’re talking about simple, effective tricks that take minutes but make a monumental difference. Let’s dive into the secrets that professional chefs and food bloggers use to make their creations pop.
1. The Foundation: Choose Your Canvas Wisely
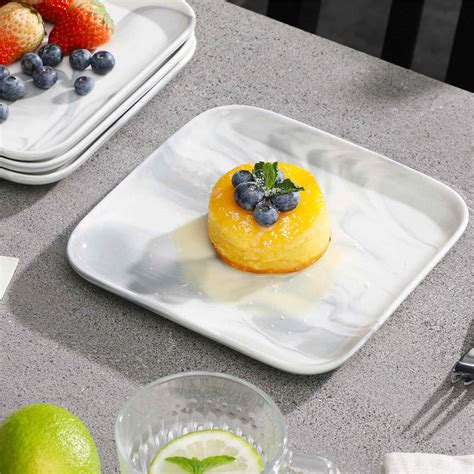
The plate itself is your first and most crucial tool. Opt for neutral-colored plates (white, grey, black) as they make your food stand out without competing for attention. Think simple, clean lines. Avoid overly busy patterns or vibrant colors that can clash with your dish. A slightly larger plate than necessary also provides valuable negative space, allowing your food to breathe and appear more sophisticated.
Consider the shape: round plates are classic, but square or rectangular plates can add a modern edge. Don’t be afraid to use bowls for dishes like stews, soups, or even pasta – their depth can create a cozy, inviting feel.
2. Build with Height and Texture
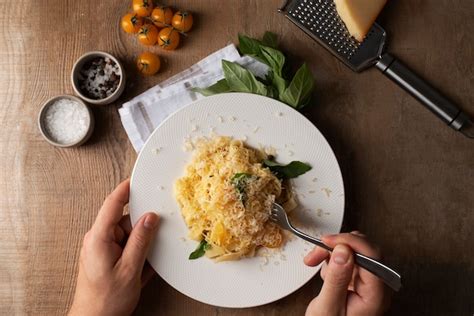
Flat food rarely looks appealing in photos. Add dimension! Think vertically. Stack components, lean ingredients against each other, or place a central element and arrange others around it. For instance, instead of just spreading rice, mold it into a neat dome. Instead of a flat pile of salad, give it some lift.
Texture adds visual interest. Incorporate elements that provide contrast: crunchy croutons on a creamy soup, a sprinkle of nuts on a soft dessert, or crisp fried onions on a stew. These textural variations are not just great for the palate but also for the eyes, creating dynamic shadows and highlights.
3. Garnish Like a Pro: The Power of Freshness
Garnish is not just an afterthought; it’s the jewelry of your dish. Fresh herbs (parsley, cilantro, mint, dill) instantly add a pop of vibrant green and a sense of freshness. A sprinkle of flaky sea salt, a crack of fresh black pepper, or a few drops of a contrasting sauce can elevate a dish from bland to brilliant.
Think about color and acidity. A wedge of lemon or lime provides bright contrast and suggests zestiness. Edible flowers add elegance and a touch of unexpected beauty. Toasted sesame seeds, chili flakes, or a dusting of paprika can also add subtle color and texture. Remember, less is often more – a strategic sprig or a focused sprinkle is better than an overwhelming mess.
4. The Art of the Drizzle and Swirl
Sauces aren’t just for flavor; they’re for art! Instead of pouring a sauce haphazardly, try these techniques:
- The Swirl: Place a dollop of sauce on the plate and use the back of a spoon to create an elegant swirl or streak.
- The Drizzle: Use a squeeze bottle or a small spoon to create fine lines or dots around your main components.
- The Pond: Create a small “pond” of sauce for your main ingredient to rest in, allowing it to pool invitingly.
Ensure your sauce isn’t too runny or too thick. The goal is control and precision. A balsamic glaze, a vibrant pesto, or a creamy aioli can transform the entire visual appeal of a dish.

5. Precision Placement and Negative Space
Think about composition. The ‘rule of thirds’ applies to food photography too. Don’t center everything. Place your main elements slightly off-center for a more dynamic and engaging shot. Arrange components in odd numbers (three scallops, five cherry tomatoes) as this often feels more aesthetically pleasing and natural.
Embrace negative space – the empty areas on your plate. This isn’t wasted space; it helps to highlight your food and prevent the plate from looking cluttered. It also gives the eye a place to rest, drawing attention back to your beautifully plated creation. A clean rim around your dish is always a sign of a professional touch.

6. The Magic of Finishing Touches
Before you even think about snapping that photo, do a final inspection. Wipe the rim of your plate clean with a damp cloth or paper towel – smudges are an amateur’s tell. A light spritz of olive oil or water can make fresh ingredients look dewy and vibrant, especially greens. For desserts, a dusting of powdered sugar or cocoa can add a delicate, professional finish.
Consider the angle from which your food will be photographed. Plate it so that its best side is facing the camera. A slightly angled shot or a direct overhead shot can completely change the perception of your dish. Always shoot in natural light if possible, as it is the most flattering for food.
Ready, Set, Plate!
These quick plating hacks are all about intention and a little bit of flair. You don’t need expensive ingredients or elaborate techniques. By paying attention to color, texture, height, and presentation, you can transform everyday meals into Instagram-worthy masterpieces. So, grab your camera, channel your inner food stylist, and get ready to impress your followers with stunning food photos!


