What’s the best lighting for appetizing Visual Bites recipe photos?

The Foundation: Understanding Light’s Impact
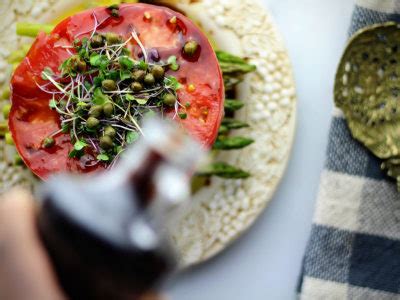
Capturing the deliciousness of a recipe goes far beyond just cooking. For your Visual Bites photos to truly entice, lighting is paramount. It dictates mood, highlights textures, and makes colors pop. Poor lighting can make even the most exquisite dish appear unappetizing, while thoughtful illumination can elevate a simple plate into a feast for the eyes.
The goal isn’t just ‘bright’ photos, but rather ‘well-lit’ photos that showcase the food’s best attributes. This guide will help you navigate the nuances of both natural and artificial light sources to make your Visual Bites shine.
Harnessing the Magic of Natural Light
For many food photographers, natural light is the holy grail, and for good reason. It’s soft, diffused, and often provides the most flattering illumination for food. The best natural light typically comes from a large window, ideally facing north or south, as this provides consistent light without harsh direct sunlight.
Position your food close to the window, but never directly in harsh sunlight, which creates strong shadows and blown-out highlights. Instead, aim for indirect light. Use a sheer curtain or a diffusion panel (even a white bedsheet can work in a pinch) to soften the light even further, creating a gentle, even glow that accentuates textures without harshness.

Mastering Artificial Light for Consistency
While natural light is beautiful, it’s not always available or consistent. This is where artificial lighting comes in. A good artificial setup allows you to shoot at any time of day, offering complete control over your light source. Softboxes are your best friend here, as they mimic the large, soft light source of a window.
When using artificial lights, avoid direct, undiffused flashes or continuous lights, as these will produce harsh, unappealing shadows. Always use a large softbox or bounce your light off a large white surface (like a wall or reflector) before it hits your food. Experiment with placing the light to the side or slightly behind your dish to create depth and dimension.

Direction and Diffusion: Key Principles
The direction of your light profoundly impacts the visual appeal of your food. Backlighting (light coming from behind the food) is often favored in food photography because it creates a beautiful rim light, highlighting edges and making liquids glow. Side lighting (light coming from the side) also works well, enhancing texture and creating appealing shadows that give depth. Avoid direct front lighting, which tends to flatten the food.
Diffusion is equally critical. Whether natural or artificial, soft light is generally more flattering for food. Use diffusers to soften harsh light and reflectors (white foam core boards work perfectly) to bounce light back into the shadowed areas, lifting them without creating new harsh shadows. This technique helps to create a balanced exposure and reveal details in both highlights and shadows.

White Balance for True Colors
Beyond brightness and direction, white balance is crucial for rendering accurate colors in your Visual Bites photos. Different light sources have different color temperatures (e.g., warm indoor lights, cool daylight). If your camera’s white balance setting doesn’t match the light source, your food can look too yellow, blue, or green.
Shoot in RAW format if possible, as it gives you more flexibility to adjust white balance in post-processing without degrading image quality. If shooting JPEG, try to set your white balance correctly in-camera using presets (daylight, cloudy, tungsten, etc.) or a custom white balance reading. Accurate white balance ensures your greens look fresh, your reds vibrant, and your browns rich and inviting.
Practical Tips for Appetizing Visual Bites
- Start Simple: Begin with a single light source (a window or one artificial light) and a reflector. Master this before adding more complexity.
- Use Negative Fill: Sometimes, too much light can be an issue. Use a black foam core board on the opposite side of your light source to absorb light and deepen shadows, adding drama and contrast.
- Experiment with Angles: Move your food, move your light, move your camera. Slight adjustments can make a significant difference.
- Observe and Learn: Pay attention to how light falls on food in magazines, cookbooks, and your favorite food blogs. Try to replicate those effects.
- Post-Processing: Even with perfect lighting, a little post-processing (adjusting exposure, contrast, highlights, shadows, and white balance) can take your photos from good to outstanding.
By understanding and applying these lighting principles, you’ll transform your Visual Bites recipe photos from simple snapshots into irresistible culinary invitations, inspiring others to recreate your delicious dishes.