What visual cues confirm perfect doneness for photo-ready roasted chicken?
Achieving a perfectly roasted chicken that not only tastes incredible but also looks stunning enough for a magazine cover can feel like a culinary quest. While internal temperature is the ultimate arbiter of doneness, a chef’s trained eye relies heavily on a series of visual cues that signal when the bird has reached its peak. For that photo-ready finish, these indicators are paramount.
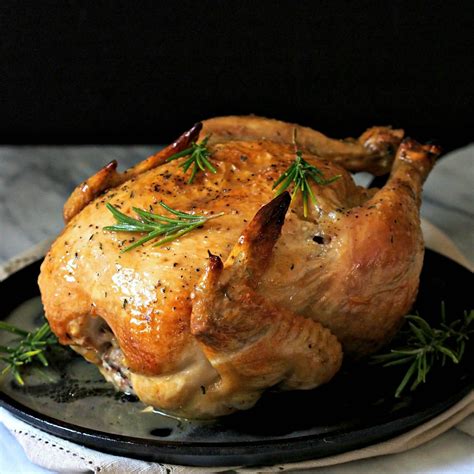
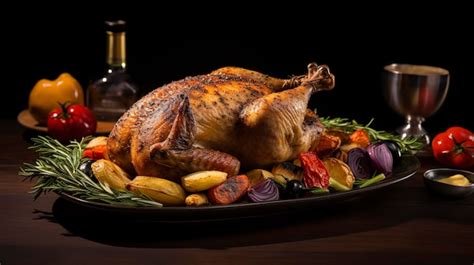
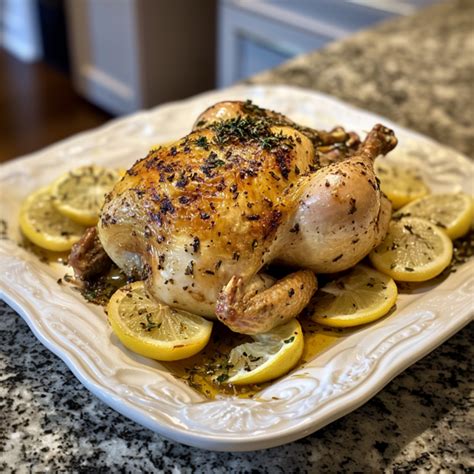
The Signature Golden-Brown, Crispy Skin
The most unmistakable sign of a beautifully cooked chicken is its skin. It should be uniformly golden to deep amber-brown, indicating a delightful caramelization and crisp texture. Avoid any pale, flabby, or burnt patches. A truly perfect roast boasts a glistening, taut skin that practically begs to be bitten into. This visual alone confirms a significant step towards doneness and provides that irresistible crunch.
Clear Juices and Wobbly Drumsticks
Once the skin is perfect, attention shifts to the interior. Pierce the thickest part of the thigh, close to the bone, with a skewer or the tip of a knife. The juices that run out should be completely clear, without any trace of pink or cloudiness. Pink juices mean it needs more time, while cloudy juices suggest it might be slightly undercooked. Concurrently, try wiggling a drumstick. If it moves easily in its socket and feels loose, almost as if it’s about to detach, the connective tissues have broken down, indicating tenderness and full doneness.
Meat Shrinkage and Bone Separation
As chicken cooks, the meat naturally shrinks slightly, pulling away from the bone. This is particularly noticeable around the leg and wing joints. You’ll see the bone becoming more exposed at the ends of the drumsticks and wings. This separation is a reliable visual cue that the muscle fibers have contracted and the chicken is fully cooked through. The meat itself should appear opaque white, with no translucency, especially in thicker parts.

Plumpness and Visual Texture
A perfectly cooked chicken should look plump and moist, not shriveled or dry. While shrinkage occurs, the overall shape should remain robust. The texture of the exposed meat (if any) should be finely textured and succulent. Overcooked chicken often looks dry, with stringy meat, while undercooked chicken can appear dense and raw. The goal is a delicate balance that promises tenderness and juiciness.
The Final Photo-Ready Polish
For that ultimate photo finish, consider a final glaze with pan drippings or a brush of herb butter after it comes out of the oven. Allow the chicken to rest for 10-15 minutes before carving. This resting period allows the juices to redistribute, resulting in a juicier bird and a more appealing presentation. A well-rested chicken retains its plumpness and is easier to carve cleanly, making every slice camera-ready. Garnishes like fresh herbs (rosemary, thyme) or citrus slices can further enhance its visual appeal.
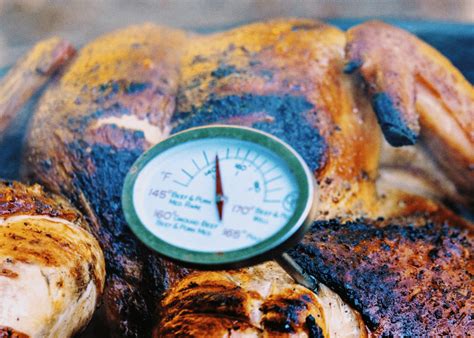
Beyond the Eye: The Thermometer’s Role
While visual cues are powerful, a meat thermometer remains the ultimate failsafe. For whole chicken, aim for an internal temperature of 165°F (74°C) in the thickest part of the thigh (without touching the bone). Using a thermometer in conjunction with these visual checks ensures consistent perfection, allowing you to fine-tune your visual assessment skills over time. It’s the combination of art and science that leads to truly impeccable results.